Table of Contents
- Accessing the Administrative Applications
- Users Application
- Groups Application
- Subscriptions Application
Accessing the Administrative Applications
Application Window
If you are designated as the Client Administrator, you can access the administrative applications using the Application Window. Open the Application Window and use the Settings tab to find the applications.

Users
Users Overview
The Users application allows you to modify user profiles, passwords, email addresses, and group access. You may also add new users manually in this application.
When you first load the application, you will see a grid containing all of the users that are considered to be your members. These are those that either you have created or have requested access to one of your groups at some point. Currently, there is no mechanism in place to remove users as it is possible that a user is a member of more than one client using a shared portal and deleting the account would remove them from all clients, not just your own.
Clicking on the Details button for a user will open their user profile. From here, you can modify their information the same way they would change their own. To make changes, you must know the user's password as that is the password that will be checked, not your own. Please exercise caution when changing a user's email address or password as this will affect them across all clients on the same portal if the portal is shared (Such as the County Portal). If you make changes to these, you should notify the user and provide them with the new information so that they can continue using the portal once the change has been made.
The groups grid below operates slightly differently for an administrator. Here you will be able to grant, deny, or remove access to your groups.
Creating New Users
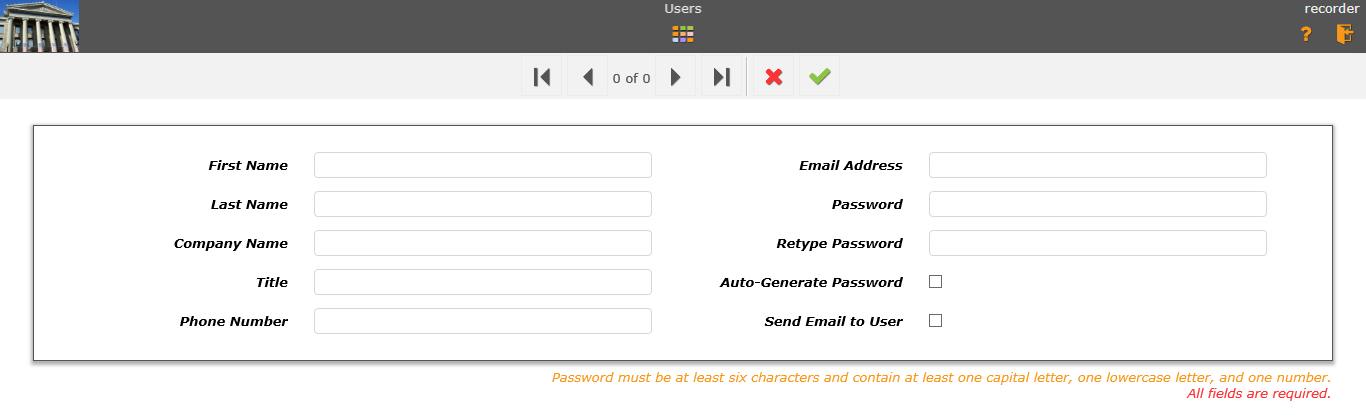
If you wish to create user accounts manually rather than allowing them to sign up through the portal, you will need to create them in the Users application. From either a user profile or the grid, click on the Add New User button to open a form to create a new user.

All of the fields must be entered to create the user. The email address will be the user's login name and the password must contain at least six characters and at least one capital letter, one lower case letter, and one number. Alternatively, you may check the Auto-Generate Password checkbox to have a password created for you. Doing so will also check the Send Email to User checkbox. This will notify the user that the account has been created and include the automatically generated password in the email. Either checkbox can be used independently of the other, though it is strongly recommended that you have the Send Email to User checkbox checked if you are automatically generating a password for the user.
Once you have created the account, you will be able to set up group access for them using the grid in the lower half of the screen.
When Users Request Group Access
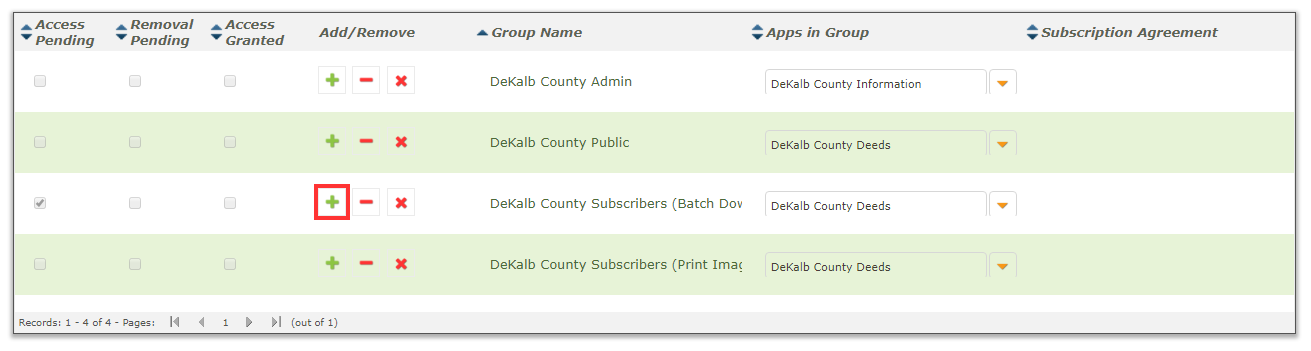
When a user requests access to a group, you will be notified via email. When you open the Users application, you will be able to see all users that have requested access to a group. They will be highlighted and moved to the front of the list for easy access. To grant or deny access, click on the Details button for the user. In the groups grid in the lower half of the screen, you will notice a series of checkboxes on the left side indicating the user's status in each group. A user requesting to join a group will have that group's Access Pending checkbox checked. If you wish to grant access to the user, click on the Add Access button in the group's row in the grid.
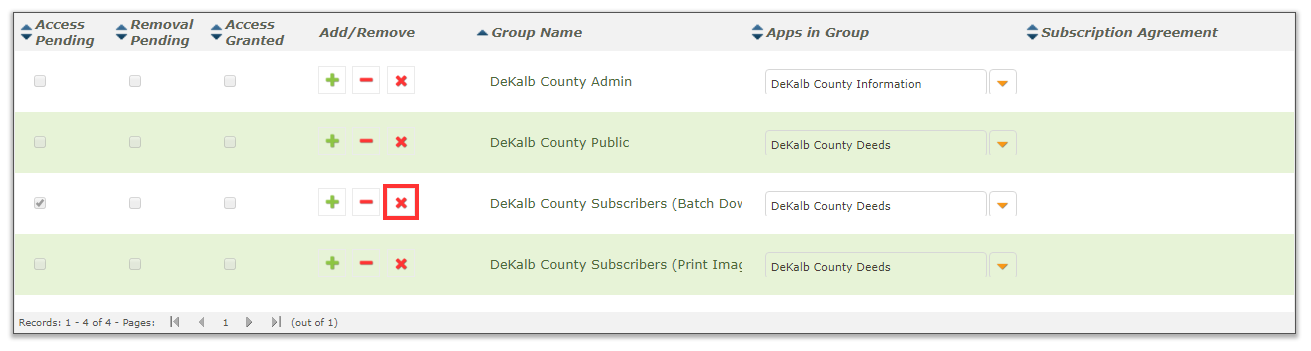
To deny the request, click on the Reject Request button instead. Repeat this for all users requesting access to your groups.
Changing a User's Group Access
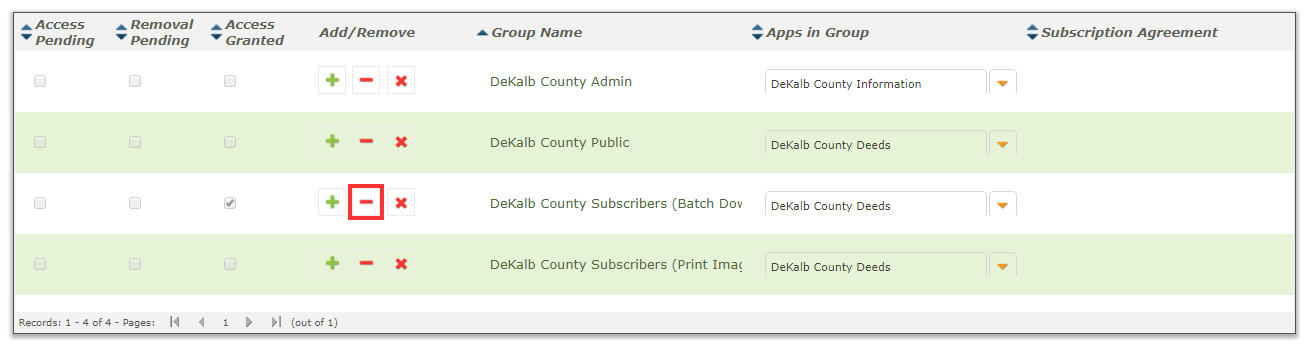
A user does not need to request access to a group for you to give them access to it. In the groups grid, find the group you wish to give the current user access to and click on the Add Access button in that row. You will be asked to confirm this, click OK if you wish to grant them access or Cancel to not. You can remove a user's access to a group that they are a member of by clicking on the Remove Access button for that group. Again, you will be asked to confirm.
Groups
Groups Overview
The Groups application is for creating and maintaining user groups. Using the application, you can change which applications are part of which groups, what permissions users in that group have with those applications, special search conditions, etc. When first loading the Groups application, you will be presented with a grid listing all of the currently existing groups. Click on the Details button for a group to view the user permissions and options for that group.
In the group's details, the basic information for the group is listed at the top of the page, while a grid of checkboxes representing various user permissions is on the lower half of the page. Along with the checkboxes is a button where a special search condition can be applied to all searches in an application by members of the group. The application name, the Add to Group checkbox, and the SQL Conditions button are fixed on the grid and will always be visible while scrolling left and right.
Creating New Groups
To create a new group, open the Groups application from the Application Window. From either the grid or the group details view, click on the Add New Group button to create a new group.
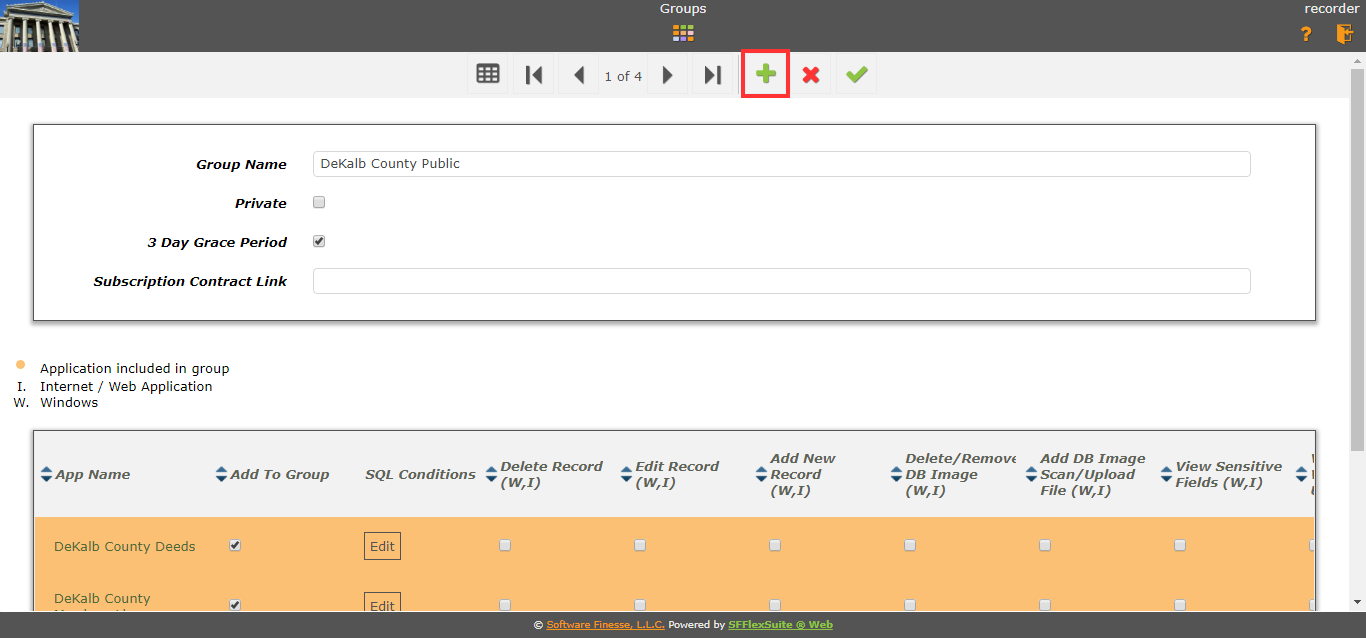
The options available on this screen are the group name, whether the group is private, whether the group has a three day grace period of temporary access without approval, and a field to enter a link to a contract for subscribers.

A private group is one that is not visible to users when they request access to groups. It will only be visible to administrators and those already within the group. In order to gain access to a private group, a user must be added to it by an administrator. This is useful for internal users that work using SFFlexSuite ® Web but that should not be visible to the general public that can access the portal.
A group with a three day grace period allows users who request access to the group temporary access to the group until an administrator can respond to the request. Groups with a three day grace period should not have access to sensitive information and are best used for applications and information that is publicly available to anyone, as well as those requiring credit card access to applications where a user might need access immediately but an administrator might not be available to grant them access, such as on a weekend or holiday.
Group Permissions
Each group has applications and each application in the group has permissions for the users while using those applications. To add an application to a group, check the Add to Group checkbox beside the application name. To remove one, uncheck the checkbox. When an application is removed from a group, all of its permissions will be removed as well and will need to be readded if the application is readded to the group at a later time.
Due to how permissions are stored, permissions for both the Windows SFFlexSuite ® application and the SFFlexSuite ® Web Platform appear on this grid. Those Marked as only being for Windows can be safely ignored, even if some appear checked. They will not take effect. From left to right, these permissions are...
| Permission Name | Platform | Description |
|---|---|---|
| Delete Record * | Web and Windows | Users are allowed to delete main records. |
| Edit Record * | Web and Windows | Users are allowed to modify main records. |
| Add New Record * | Web and Windows | Users are allowed to create main records. |
| Delete/Remove DB Image ** | Web and Windows | Users are allowed to delete documents and images from main records. |
| Add DB Image Scan/Upload File ** | Web and Windows | Users are allowed to upload documents and images to main records. |
| View Sensitive Fields | Web and Windows | Users are allowed to view fields marked as sensitive. |
| View Records With User ID | Web and Windows | Users are only allowed to view main records they have created. |
| Delete Multiple Record | Web and Windows | Users are allowed to delete multiple subrecords from main records. |
| Edit Multiple Record | Web and Windows | Users are allowed to modify multiple subrecords in main records. |
| Add New Multiple Record | Web and Windows | Users are allowed to create multiple subrecords in main records. |
| DB Scanner Setup | Windows | Does nothing in SFFlexSuite ® Web. |
| DB Process Setup | Windows | Does nothing in SFFlexSuite ® Web. |
| License Release Timer Setup | Windows | Does nothing in SFFlexSuite ® Web. |
| Annotations Setup | Windows | Does nothing in SFFlexSuite ® Web. |
| Modify DB Image | Windows | Does nothing in SFFlexSuite ® Web. |
| Reposition/Remove DB Image | Windows | Does nothing in SFFlexSuite ® Web. |
| Reset Edit Flag | Windows | Does nothing in SFFlexSuite ® Web. |
| Email Setup | Windows | Does nothing in SFFlexSuite ® Web. |
| DB Window Panel Settings | Windows | Does nothing in SFFlexSuite ® Web. |
| DB Window Search Option Settings Only | Windows | Does nothing in SFFlexSuite ® Web. |
| Add/Delete Annotations | Windows | Does nothing in SFFlexSuite ® Web. |
| View Images ** | Web | Users are allowed to view documents and images. |
| Export Images ** | Web | Users are allowed to batch export documents and images. |
| Export Records | Web | Users are allowed to batch export records. |
| View Reports *** | Web | Users are allowed to access and view reports. |
| Print Images ** | Web | Users are allowed to print documents and images. |
| View Only One Record Only | Windows | Does nothing in SFFlexSuite ® Web. |
| Download Images ** | Web | Users are allowed to download documents and images. |
| View Records With Group ID | Web | Users are only allowed to view main records created by members of this group. |
| Payable | Web | Users must make a credit card payment for temporary access to this application. |
- Some permissions require that the application is configured for the feature relating to the permission. If the application does not use the feature, the permission will be ignored.
- *Application must have adding/deleting/editing records enabled in addition to this permission
- **Application must have images enabled in addition to this permission
- ***Application must have reports enabled in addition to this permission
Group SQL Conditions
An application's SQL conditions is a series of conditions using SQL syntax to be added to all searches performed by members of the group for the application. This setting should only be modified by a database administrator. The value input into this field is attached to the search terms for the application using the AND keyword and should not begin with it.
Subscriptions
Subscriptions Overview
The Subscriptions application allows you to set up and manage user subscription access to applications. Using the application, you can modify and update user subscriptions by changing the start and end date, whether payment has been received, and whether to restrict access to users to data created within a date range. When you first open the application, you will be shown a grid containing all of the users connected to your organization through the portal. To view a user's subscription(s), click on the Details button in that user's row.
In the user's details, you will see their basic information, as well as a grid at the lower half of the screen that will display any active or expired subscriptions. This will show which applications the user is subscribed to, when the subscription expires, when the grace period expires, the invoice requested expiration, whether payment was received, and the date range for record searches permitted to the user. If a subscription has expired, it will be highlighted in orange to make it easier to find.
Managing Subscriptions
In order to add subscriptions, at least one application a user can access must be set up for subscription services. To add a subscription to a user, click on the Add New link on the top left corner of the grid.

If there are any applications available for subscription that the user is not already subscribed to, a window will appear, allowing you to select which application, what the expiration date should be, whether payment has been received, and what date range (if any) should the user be restricted to viewing. Fill out the necessary information, the Search Date fields can be left blank if there is no restriction, or only one can be entered to limit it either to those dates after the start date or those before the end date. If both are filled, only those between (and including) the dates entered will be visible to the user. To save the subscription, click on the Save button at the end of the form. To cancel, close the window by clicking on the X in the upper right corner of the popup window. If there are no available applications for the user, a message will appear informing you of this when you attempt to add a subscription.
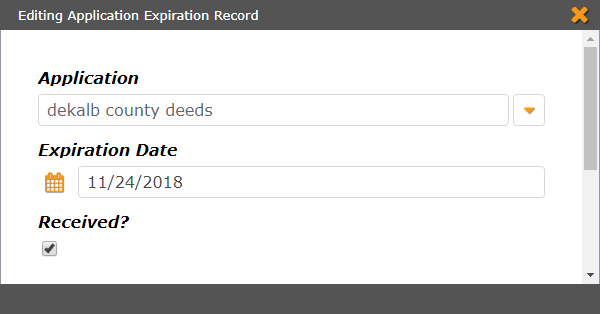
To modify a user's subscription, click on the Edit link in the row with the appropriate application. A window will appear allowing you to make adjustments to the information, such as updating the expiration date if the subscription is renewed, or changing whether the user has paid the subscription. Click on the Save button at the bottom of the form to save the new information, or click on the X in the top right corner of the popup window to cancel and close the window.